As a beginner, Stripe documentation can give me a headache. When I tried to set it up for the first time, I got confused. Luckily, I managed to figure it out, and here I will make it short and understandable. I will use Next.js for this tutorial.
Table of contents
Open Table of contents
1. Setup Stripe Account
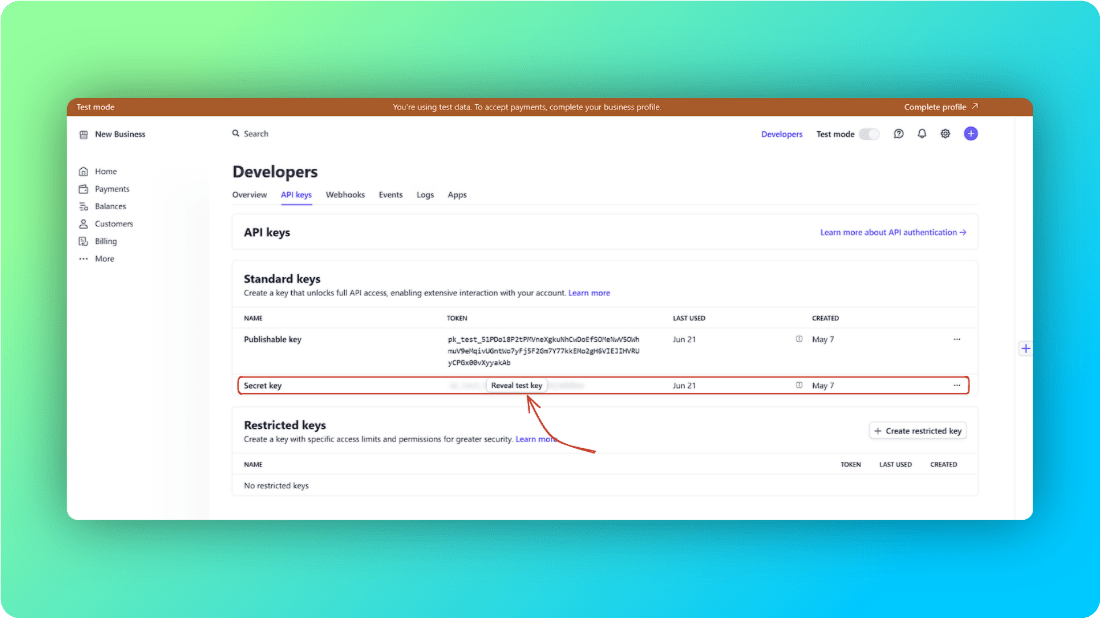
You need to create a Stripe account to get a few keys and put those in our .env file. Then, head over to the dashboard and hit the Developers tab.
// file: .env
STRIPE_SECRET_KEY = yoursecretkey;
Make sure you’re in test mode because you need to complete your business profile to proceed to live mode.
2. Understanding Stripe Checkout Flow
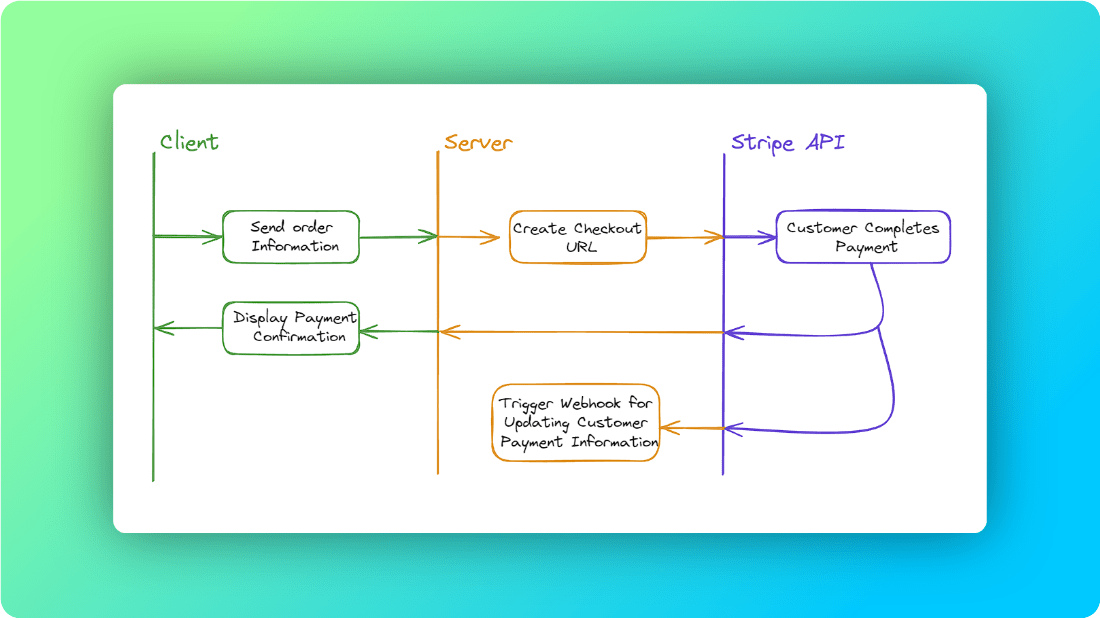
To complete a Stripe payment, we should understand the basics of the checkout session flow. Basically, we need an item, display it to the Stripe checkout session URL, and create an endpoint for the webhook event. I’ll cover the Stripe webhook event in the next post.
For the database, there should be at least five tables, which are:
- User
- Order
- Item
- BillingAddress
- ShippingAddress
The billing address and shipping address are similar, but they’re different. The billing address means payment verification and confirmation during online transactions, while the shipping address means delivery of purchased products to a specified location.
3. Integrate
I use Prisma as ORM because it makes the code easier to read, at least for me. Also, I use @tanstack/react-query for fetching, caching, synchronizing, and updating the server state. This is how you can install it inside a Next.js project:
npm install prisma @prisma/client @tanstack/react-queryThen execute:
npx prisma initThis will create a new folder called Prisma, and in the schema.prisma file, you can write like this:
// file: prisma/schema.prisma

enum OrderStatus {
  fulfilled
  shipped
  awaiting_shipment
}

model User {
  id        String  @id @default(cuid())
  email     String
  Order     Order[]
  createdAt DateTime @default(now())
  updatedAt DateTime? @updatedAt
}

model Item {
  id              String        @id @default(cuid())
  name            String
  Order           Order[]
  userId          String
}

model Order {
  id                String           @id @default(cuid())
  itemId            String
  item              Item    @relation(fields: [itemId], references: [id])
  user              User             @relation(fields: [userId], references: [id])
  userId            String
  amount            Float
  isPaid            Boolean          @default(false)
  status            OrderStatus      @default(awaiting_shipment)
  shippingAddress   ShippingAddress? @relation(fields: [shippingAddressId], references: [id])
  shippingAddressId String?
  billingAddress    BillingAddress?  @relation(fields: [billingAddressId], references: [id])
  billingAddressId  String?

  createdAt DateTime @default(now())
  updated   DateTime @updatedAt
}

model ShippingAddress {
  id          String  @id @default(cuid())
  name        String
  street      String
  city        String
  postalCode  String
  country     String
  state       String?
  phoneNumber String?
  orders      Order[]
}

model BillingAddress {
  id          String  @id @default(cuid())
  name        String
  street      String
  city        String
  postalCode  String
  country     String
  state       String?
  phoneNumber String?
  orders      Order[]
}
Then we need to instantiate Prisma to make sure it just run once and create a new folder inside the src folder called db so we can make queries later on:
// file: src/db/index.ts
import { PrismaClient } from "@prisma/client";

declare global {
  var cachedPrisma: PrismaClient;
}

let prisma: PrismaClient;

if (process.env.NODE_ENV === "production") {
  prisma = new PrismaClient();
} else {
  if (!global.cachedPrisma) {
    global.cachedPrisma = new PrismaClient();
  }

  prisma = global.cachedPrisma;
}

export const db = prisma;
One more thing. We will use server actions to create a checkout session. So, create one more file inside the route folder called action.ts, and inside it, we want to write logic for price, existing orders, and generating session URLs.
// file: src/app/checkout/action.ts
"use server";

import { db } from "@/db";
import { stripe } from "@/lib/stripe";
import { Order } from "@prisma/client";
import { getKindeServerSession } from "@kinde-oss/kinde-auth-nextjs/server";

export const createCheckoutSession = async ({
  itemId,
}: {
  itemId: string;
}) => {
  const item = await db.item.findUnique({
    where: { id: itemId },
  });

  if (!item) {
    throw new Error("No such item found");
  }

  // logic for auth check
  const { getUser } = getKindeServerSession()
  const user = await getUser()

  if(!user) {
    throw new Error("You need to be logged in");
  }

  // you can write logic for determine price here

  let order: Order | undefined = undefined

  const existingOrder = await db.order.findFirst({
    where: {
      userId: user.id,
      itemId
    }
  })


  if(existingOrder) {
    order = existingOrder
  } else {
    order = await db.order.create({
      data: {
        amount: // your price,
        userId: user.id,
        itemId,
      }
    })
  }

  const product = await stripe.products.create({
    name: "YOUR PRODUCT",
    images: // your image product URL,
    default_price_data: {
      currency: "USD",
      unit_amount: // your price,
    }
  })

  const stripeSession = await stripe.checkout.sessions.create({
    success_url: // your url if the user complete the payment
    cancel_url: // your url if the user cancel their payment
    payment_method_types: ["card", "link"],
    mode: "payment",
    shipping_address_collection: {
      allowed_countries: ["US", "CA", "ID", "DE"]
    },
    metadata: {
      userId: user.id,
      orderId: order.id
    },
    line_items: [{ price: product.default_price as string, quantity: 1 }],
  })

  return { url: stripeSession.url }
};
After that, we’re ready to create a checkout session from the client. You can put this code on any page that has the last step for payment or summary. The payment checkout session URL will be redirected if createPaymentSession is triggered. This is usually a checkout button or submit button. Here it is:
// file: src/app/checkout/page.tsx

import { useMutation } from "@tanstack/react-query";
import { createCheckoutSession } from "./action";
import { ArrowRight } from "lucide-react";

  const Page = () => {

  const { mutate: createPaymentSession } = useMutation({
    mutationKey: ["get-checkout-session"],
    mutationFn: createCheckoutSession,
    onSuccess: ({ url }) => {
      if (url) router.push(url);
      else throw new Error("Unable to retrieve payment URL.");
    },
    onError: () => {
      // you can trigger toast or notification right here
      console.error("Something went wrong!")
    },
  });

  // example checkout button
  return (
    <div>
       <Button
          onClick={() => createPaymentSession("ITEM ID")}
          className="px-4 sm:px-6 lg:px-8"
          >
          Check out <ArrowRight className="h-4 w-4 ml-1.5 inline" />
       </Button>
    </div>
  )
  }
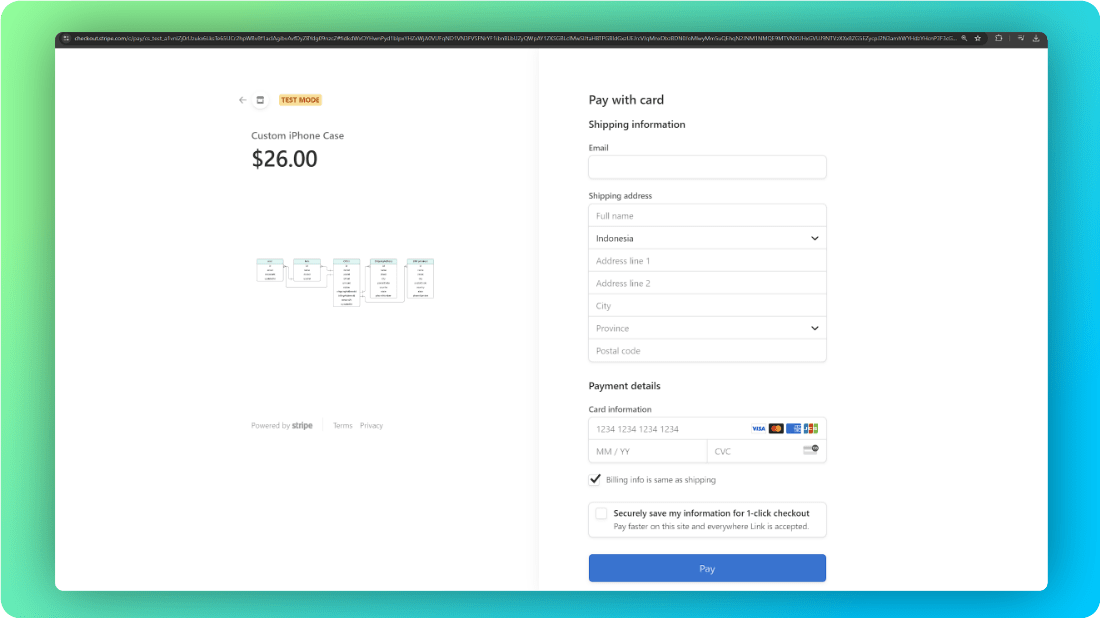
If you run the code and trigger createPaymentSession, it will redirect to a dedicated page from Stripe:
That’s it. If you check your Stripe payment history, it will be recorded when you’re creating the checkout session. If it’s successfully paid, it will trigger our webhook endpoint and update the payment status, address, etc. I will cover this in the next post.
See you in the next post :)


