Developing web apps is getting easier these days, thanks to the release of many new tools that simplify the process. Uploadthing offers simplicity and generous features to make file uploads convenient. It’s comparable to Amazon S3 Cloud Storage, but I won’t elaborate on their differences in this post. Instead, I will share my experience with installing Uploadthing, uploading an image, and displaying it on the client side.
Table of contents
Open Table of contents
1. Why Uploadthing?
I started using Uploadthing because it’s similar to S3 but simpler. In terms of pricing, Uploadthing charges based on storage capacity with unlimited uploads and downloads, while S3 charges per 1,000 requests in addition to storage. What makes Uploadthing even better for TypeScript developers is its full type safety and ready-to-use authentication. On the client side, they offer a React client library with convenient components, hooks, and more. This is more than enough for me as a developer who wants to avoid complications.
2. Uploading From Next.JS
The first thing you need to do is visit their website and sign in. At the top, click + Create a new app, then enter your app name and select the app default region (choose the one closest to your area).
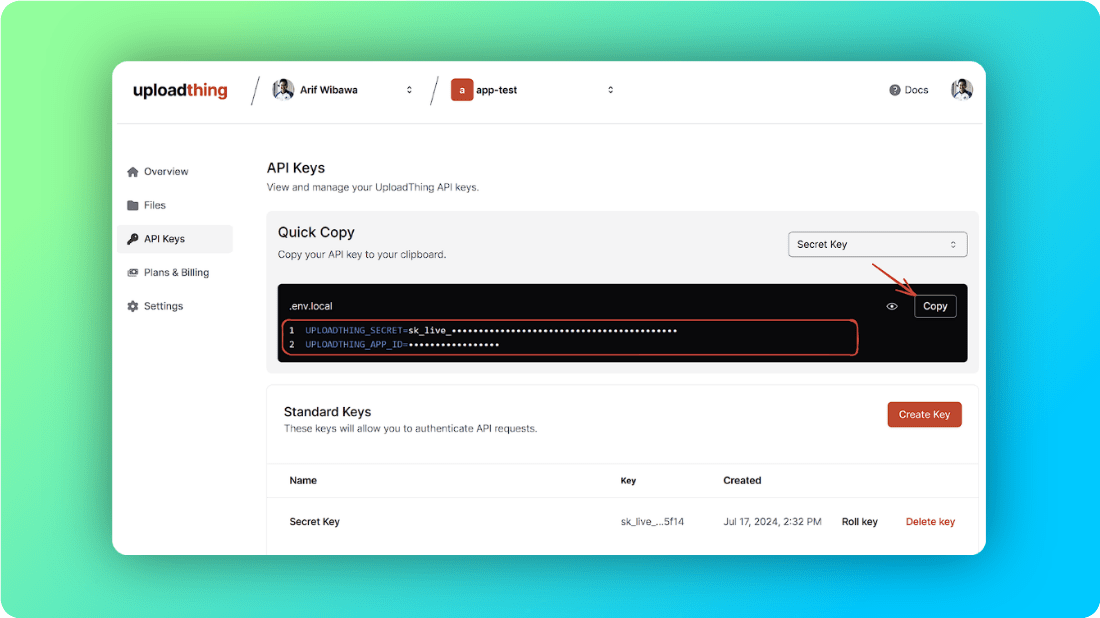
Next, go to the API Keys tab. Copy UPLOADTHING_SECRET and UPLOADTHING_APP_ID to your .env file in your Next.js project.
Open your Next.js project in your favorite code editor and run the following command:
npm install uploadthing @uploadthing/react zod react-dropzone lucide-reactCreate new files in src/app/api/uploadthing/core.ts and src/app/api/uploadthing/route.ts. In route.ts, write the following code:
// file: src/app/api/uploadthing/route.ts
import { createRouteHandler } from "uploadthing/next";

import { ourFileRouter } from "./core";

export const { GET, POST } = createRouteHandler({
  router: ourFileRouter,
});
In core.ts, write the following code:
// file: src/app/api/uploadthing/core.ts
import { createUploadthing, type FileRouter } from "uploadthing/next";
import { z } from "zod";
import sharp from "sharp";

const f = createUploadthing();

export const ourFileRouter = {
  // Define as many FileRoutes as you like, each with a unique routeSlug
  imageUploader: f({ image: { maxFileSize: "4MB" } }) // this where you can set the limit of file
    .input(z.object({ itemId: z.string().optional() }))
    // Set permissions and file types for this FileRoute
    .middleware(async ({ input }) => {
      return { input };
    })
    .onUploadComplete(async ({ metadata, file }) => {
      const { itemId } = metadata.input;

      const res = await fetch(file.url);
      const buffer = await res.arrayBuffer();

      const imgMetadata = await sharp(buffer).metadata();
      const { width, height } = imgMetadata;

      if (!itemId) {
        const item = await db.item.create({
          data: {
            imageUrl: file.url,
            height: height || 500,
            width: width || 500,
          },
        });
        return { itemId: item.id };
      } else {
        // this where you want to update the data to database
        const updatedItem = await db.item.update({
          where: {
            id: itemId,
          },
          data: {
            updatedImageUrl: file.url,
          },
        });

        return { itemId: updatedItem.id };
      }
    }),
} satisfies FileRouter;

export type OurFileRouter = typeof ourFileRouter;
In core.ts, you can specify the inputs you’re going to update after the images are successfully uploaded. For example, I used itemId because, on the client side later, it will update the database if the itemId exists. Otherwise, it will create a new row in the database.
One more thing, create a helper in src/lib/uploadthing.ts for a hook on the client side. Write the following code:
// file: src/lib/uploadthing.ts
import { OurFileRouter } from "@/app/api/uploadthing/core";
import { generateReactHelpers } from "@uploadthing/react";

export const { uploadFiles, useUploadThing } =
  generateReactHelpers<OurFileRouter>();
In your client-side file, for example src/app/upload/page.tsx, write the following code:
import { useUploadThing } from "@/lib/uploadthing";
import { cn } from "@/lib/utils";
import { useState, useTransition } from "react";
import { useRouter } from "next/navigation";
import DropZone, { FileRejection } from "react-dropzone";
import { Image, Loader2, MousePointerSquareDashed } from "lucide-react";

const Page = () => {
  const [isDragOver, setIsDragOver] = useState<boolean>(false);
  const [isPending, startTransition] = useTransition();
  const [uploadProgress, setUploadProgress] = useState<number>(0)
  const router = useRouter()

  const {startUpload, isUploading} = useUploadThing("imageUploader", {
    onClientUploadComplete: ([data]) => {
      const itemId = data.serverData.itemId // itemId that we got from core.ts after successfully uploaded
      startTransition(() => {
        router.push(`/upload/image?id=${itemId}`)
      })
    },
    onUploadProgress(p) {
      setUploadProgress(p)
    }
  })

  const onDropRejected = (rejectedFiles: FileRejection[]) => {
    const [file] = rejectedFiles
    setIsDragOver(false)

    if (file.file.size > 5242880) {
      // trigger if file size above 5MB
    }

    if (file.file.type !== "image/png" && file.file.type !== "image/jpg" && file.file.type !== "image/jpeg") {
      // trigger if file format other than jpg,png, and jpeg
    }
  };

  const onDropAccepted = (acceptedFiles: File[]) => {
    startUpload(acceptedFiles, {itemId: undefined})

    setIsDragOver(false)
  };

  return (
    <div
      className={cn(
        "relative h-full flex-1 my-16 w-full rounded-xl bg-gray-900/5 p-2 ring-1 ring-inset ring-gray-900/10 lg:rounded-2xl flex justify-center flex-col items-center",
        {
          "ring-blue-900/25 bg-blue-900/10": isDragOver,
        }
      )}
    >
      <div className="relative flex flex-1 flex-col items-center justify-center w-full">
        <DropZone
          onDropRejected={onDropRejected}
          onDropAccepted={onDropAccepted}
          onDragEnter={() => setIsDragOver(true)}
          onDragLeave={() => setIsDragOver(false)}
          maxSize={5242880}
          accept={{
            "image/png": [".png"],
            "image/jpeg": [".jpeg"],
            "image/jpg": [".jpg"],
          }}
        >
          {({ getRootProps, getInputProps }) => (
            <div
              className="h-full cursor-pointer w-full flex-1 flex flex-col items-center justify-center"
              {...getRootProps()}
            >
              <input {...getInputProps()} />
              {isDragOver ? (
                <MousePointerSquareDashed className="h-6 w-6 text-zinc-500 mb-2" />
              ) : isUploading || isPending ? (
                <Loader2 className="animate-spin h-6 w-6 text-zinc-500 mb-2" />
              ) : (
                <Image className="w-6 h-6 text-zinc-500 bg-2" />
              )}
              <div className="flex flex-col justify-center mb-2 text-sm text-zinc-700">
                {isUploading ? (
                  <div className="flex flex-col items-center">
                    <p>Uploading...</p>
                  </div>
                ) : isPending ? (
                  <div className="flex flex-col items-center">
                    <p>Redirecting, please wait...</p>
                  </div>
                ) : isDragOver ? (
                  <p>
                  <span className="font-semibold">Drop file </span>
                  to upload
                  </p>
                ) : (
                  <p>
                  <span className="font-semibold">Click to upload </span>
                  or drag and drop
                  </p>
                )}
              </div>

              {isPending ? null : <p className="text-xs text-zinc-500">PNG, JPG, JPEG</p>}
            </div>
          )}
        </DropZone>
      </div>
    </div>
  );
};

export default Page;
That’s it. Hope this helps. See you in the next post!

